
06 Feb Top 10 Ideas for Valentine’s Day Cards

Are you looking for some great ideas for Valentine’s Day? How about making something that your Valentine can cherish forever, such as a handmade card? There are so many creative ways to make your very own personalized Valentine’s day card. In fact, every Valentine’s day, Rich has made me the most beautiful card! It’s the best Valentine’s Day gift, and I’ve treasured every one of them!
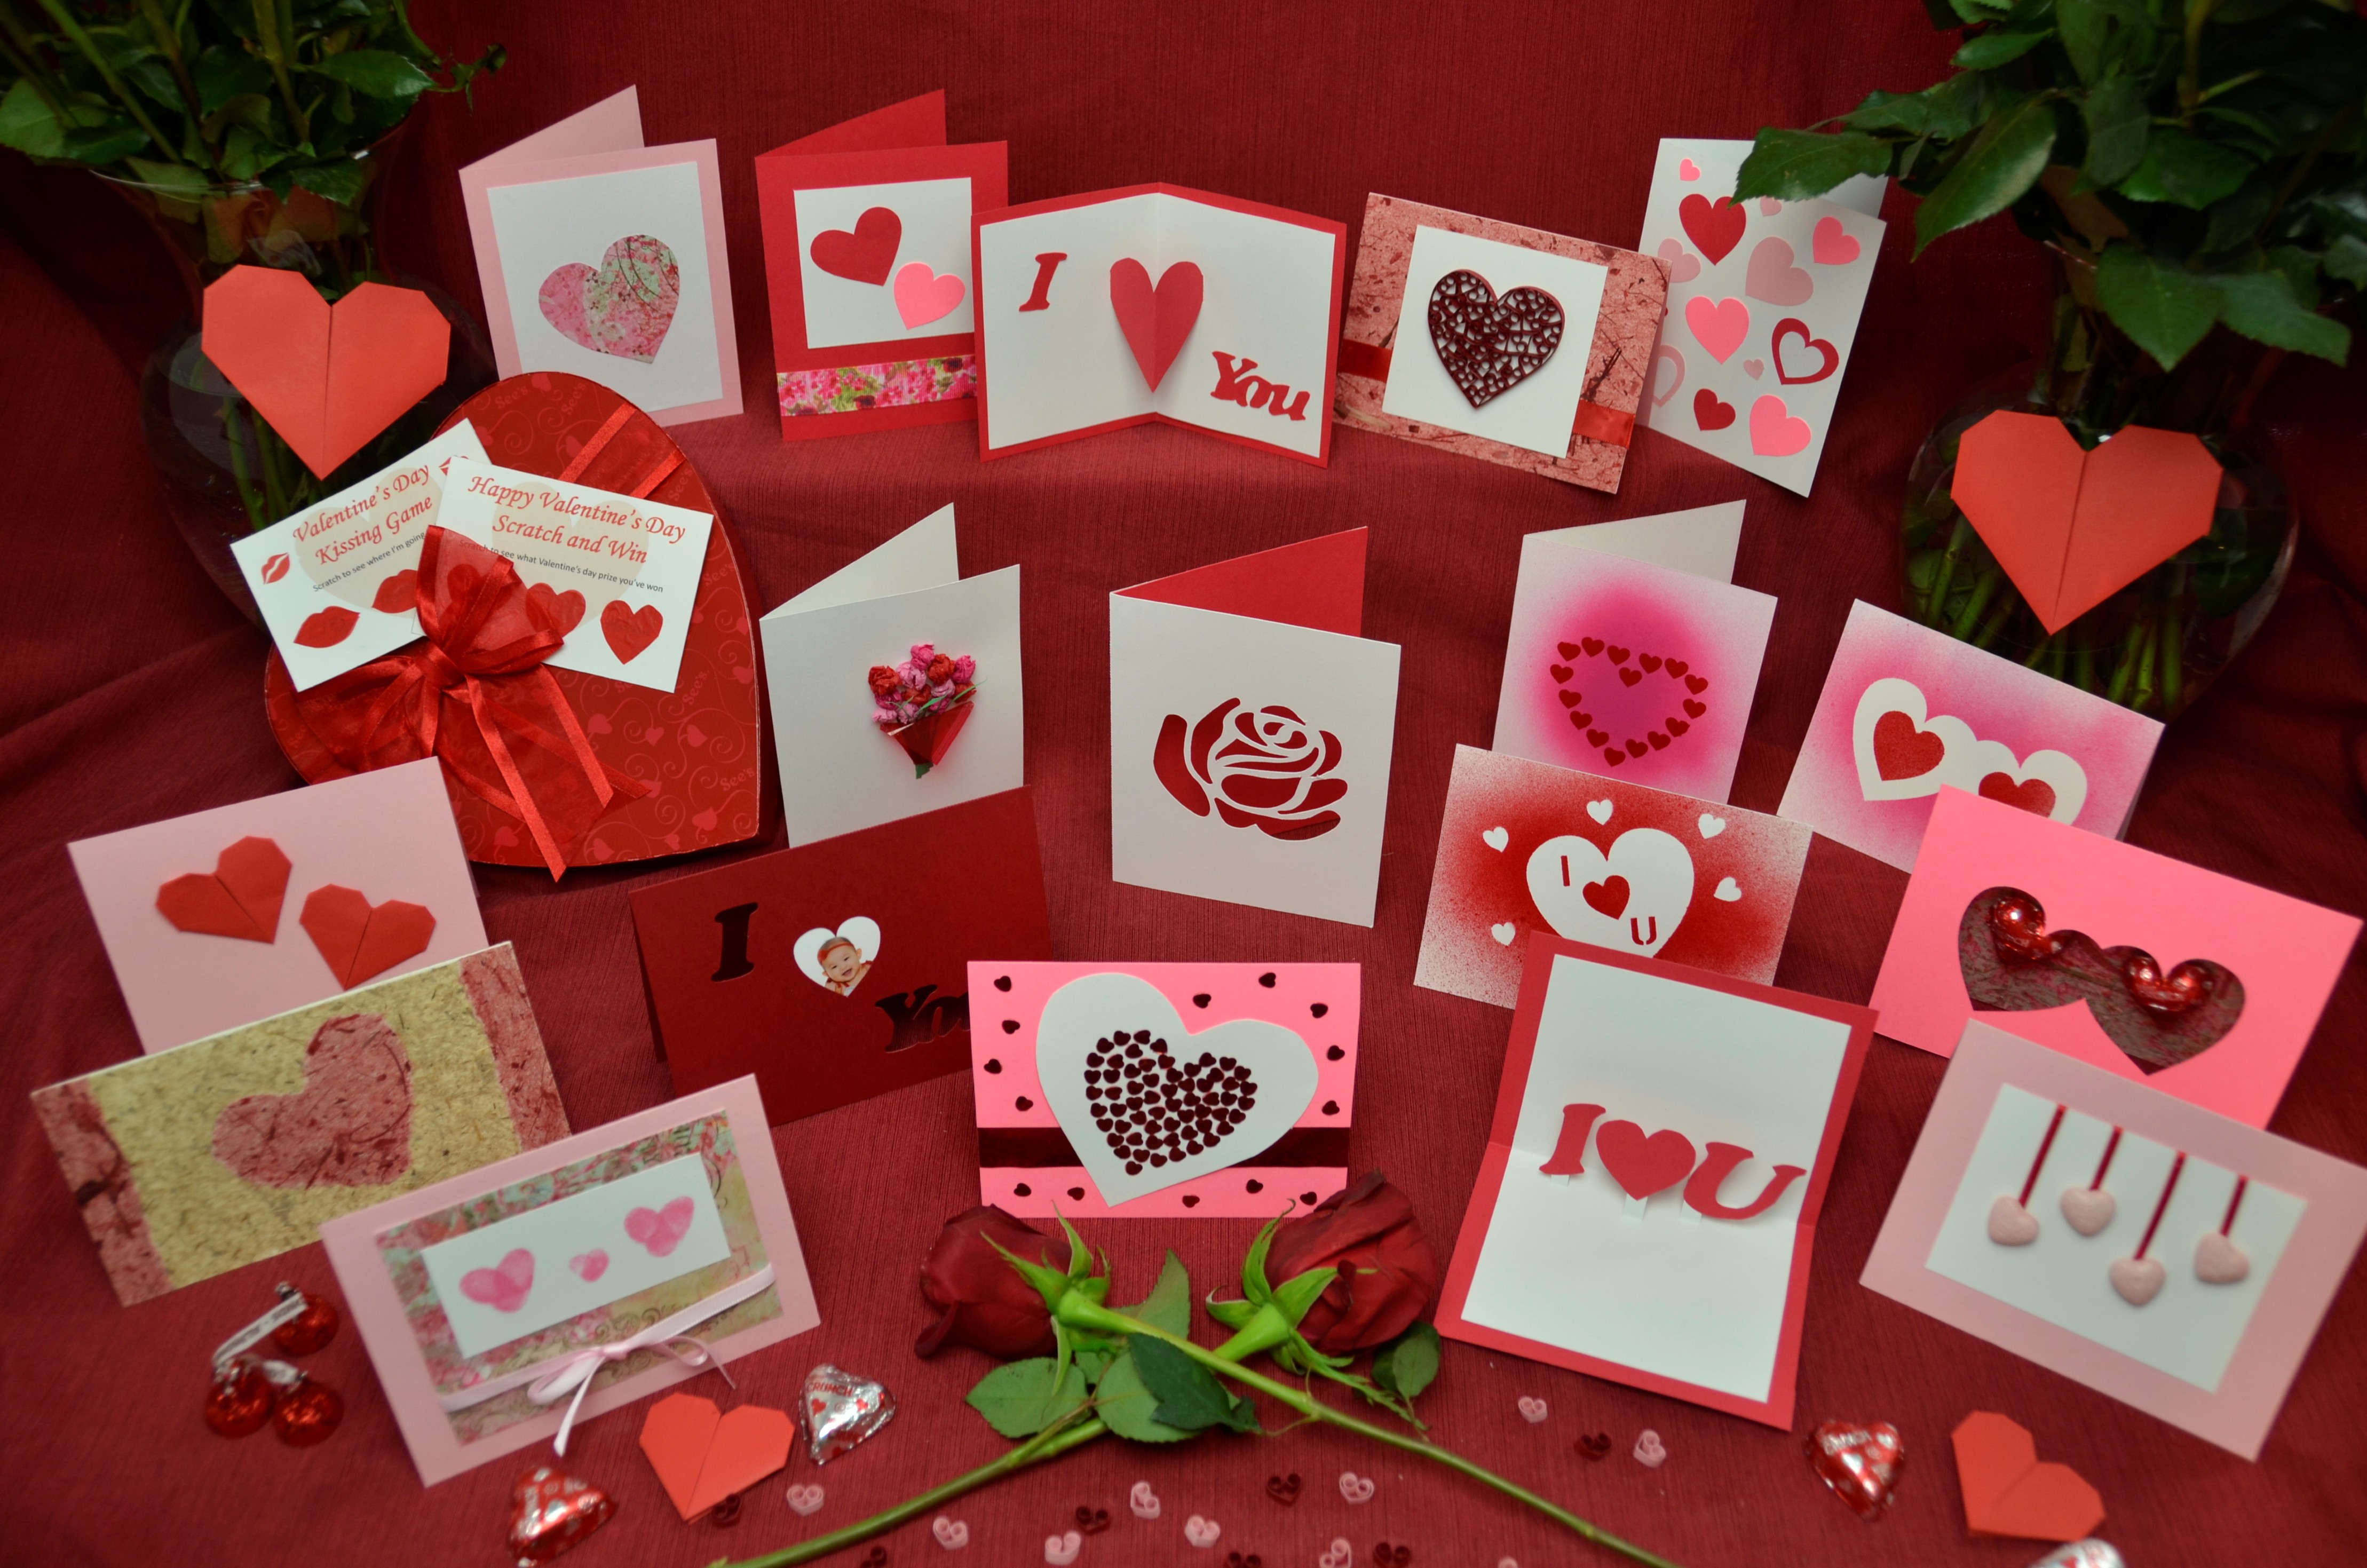
To give you some ideas for Valentine’s day cards, I'm going to provide 10 creative options to make a memorable Valentine's Day card that will be a keepsake, long after Valentine's Day passes. Rich and I have searched for hours to find the best and most creative card designs on the internet and we will show you 37 cards we made to help give you inspiration for your own creation. You will never run out of ideas to create a new Valentine’s day card to surprise that special person in your life! Click below to navigate directly to each design.
Pop Up Cards
Cut Out Hearts Cards
Stencil Cards
Window Cards
Quilled Cards
Origami Hearts Cards
Finger Prints Cards
Tissue Paper Flowers Cards
Candy Covered Cards
Scratch-off Hidden Message Cards
Pop Up Cards
I may be a little biased, but pop up cards are the most impressive types of Valentine’s Day cards to make for someone. That’s why my Rich makes them for me, because he’s always still finding ways to impress me! I find it so sweet!
The 3-dimensional nature of the card often surprises the person receiving the card when he or she opens it. Pop up cards are more complex to make than normal cards, and requires a little more effort to make, but definitely well worth it as it tends to give a higher WOW factor! Within the category of pop up cards, there is a wide range of designs with varying levels of difficulty. The two most common Valentine’s Day pop up cards are the simple “Center Folded Heart Card” and the “90 Degree Stepped Heart Card”. If you have children, these pop up cards are simple enough to make with them. They are wonderful craft ideas!
Center Folded Heart Card
This is what the “Center Folded Heart Card” looks like.


The cards on the left and center are made from 2 sheets of colored card stock. The card on the right was made with one sheet of printed card stock. To make the cards shown above, watch Rich’s tutorial below.
You can get the FREE templates here: FREE Center Folded Heart Pop Up Card Template.
Here are step by step instructions on how to make the “Center Folded Heart Card”:
1. Fold a sheet of card stock in half.
2. Cut the shape of half a heart along the folded edge, leaving the edge of the heart furthest away from the center fold uncut. The uncut section should be parallel with the center fold.
3. Unfold the card and reverse the folds of the heart so that the center of the heart folds inwards when the card is closed.
4. Glue another piece of card stock to the outside off the card.
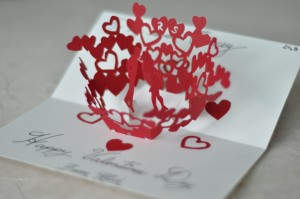
90 Degree Stepped Heart Card
The second most common Valentine’s Day pop up card is the “90 Degree Stepped Heart” card. This is what the card looks like:


There are several different versions of this card. Here is Rich's video on how to make this card:
You can get the free template with all versions here: FREE Stepped Heart Pop Up Card Template.
Here are step by step instructions on how to make the “90 Degree Stepped Heart Card”:
1. Fold a sheet of card stock in half.
2. Cut two slits of the same length perpendicular to the folded edge.
3. Unfold the card and reverse the folds of the “step” so that it folds inwards.
4. Cut out a heart shape from another piece of card stock and glue it to the “step” of the inside card.
5. Glue another piece of card sock to the outside of the card.
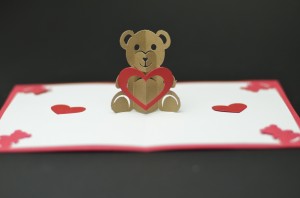
If you want to make a pop up card that is guaranteed to impress, then try making one of the unique pop up cards below! Just click on the image for the tutorial.


After making such an impressive Valentine’s Day pop up card, you may be wondering how one would go about decorating the front cover of the card? You can use some of the designs from the following cards to decorate your pop up card. These designs are also great to make as a standalone card, with your personal message in the inside.
Cards With Cut Out Hearts
The simplest way to decorate your card is to glue hearts to the front cover of your Valentine’s Day card. The hearts can be different sizes, shapes or colors. They can be placed in random, or a pattern. Here are examples of simple cards we made decorated with cut out hearts.


These are the 4 simple steps to decorate your card with cut out hearts.
1. Create a template for your hearts by folding a piece of card stock or paper in half and cutting out half the heart along the center crease. You can also cut the hearts out directly using this method if you don’t mind a crease down the center of your heart. This may take a little practice to get the shape of the heart just right. If you are good at freehand drawing or if you want to make asymmetrical hearts, then just draw the hearts by hand and skip to the third step.
2. Use the hearts you just cut out to trace heart shapes on the paper you want to make your hearts out of. This is assuming you don’t use your heart cut outs (with the crease down the center) directly on your card. The paper you trace the hearts on can be as simple as construction paper or colored card stock. You can also be creative by using custom patterned paper from an art store such as Michaels. Try using different textured papers to not only give your card contrasting colors, but also contrasting textures. My favorite papers are the rough unfinished papers where you can see the fibers, and sometimes embedded flower petals. If you don’t have an art store nearby, you can also use paper around the house such as wrapping paper (which sometimes have a nice shiny finish), card board, newspaper/magazines, sheet music, or even recycled junk mail.
3. Cut out the hearts that you traced. Another variation is to tear the heart shapes so the edges of the paper are rough. This works best with textured paper that has a lot of fibers. This will take some practice. You can also fold the paper in half and tear the outline of half the heart along the crease so that the heart is symmetrical.
4. Glue the hearts on the front cover in a creative pattern. You can glue one simple heart in the center or you can glue many hearts in a set or random pattern.
For more creative ideas inspiration on decorating your card using cut out hearts, check out Pink and Green Mama's cards, Sew Woodsy, and Lynn Mccorry's designs.
Stencil Cards
Using stencils is a great way to create hearts on the front of your card. There are two general ways to use stencils. You can cut a hole and color inside the hole, or cut a shape and color around the shape. You can be very creative with the way you color inside or around your stencil. You can use almost any media such as spray paint, spray inks, markers, pastels, acrylics, watercolor, glitter…the possibilities are endless! Try experimenting on some scrap paper to see which media you like best. We had some fun making cards with stencils. We made the cards below using stencils and spray paint.


We also used acrylic paint and stencils for a very simple brushed look.


Using a stencil heart, we created the cards below with a marker (left) and glue and glitter (right).


You can download the FREE template we created to make these stencil cards here: FREE Stencil pattern for Valentine’s day cards.
Here are instructions on how to use stencil techniques to decorate your Valentine’s Day card.
1. Create a stencil by cutting out your desired shapes in a piece of paper or card stock. To make hearts, fold your cardstock or paper in half and cut half a heart along the crease. Now you can use the heart hole or the heart itself as a stencil. If you’re using the heart hole as a stencil, then make sure that the entire stencil is larger than your card so you don’t get any of your colors where you don’t want them to be. I find that using a paper stencil works better than cardboard.
2. This step is optional but I find it helpful. Use repositionable glue or spray (Krylon Easy Tact Spray) to attach the stencil to your card. This helps prevent colors from getting underneath your stencil, especially if you use a spray paint. You can also use some double-sided tape, but you want to be very careful not to tear your card while removing the stencil. To reduce the stickiness of the tape, I sometimes stick it to my clothes to get some lint stuck on it first.
3. Use your chosen media to color inside or around your stencil. Make sure you do not color underneath your stencil. This may take some practice to get the perfect look. You can even try to mix different media: acrylic and glitter, spray paint and pastel…etc. You can even use both the window or shape stencil together with different sized hearts.
Here are other examples of stencil cards using acrylic paint from Bless This Mess and spray inks from Artful Kids. The Crafty Crow used a very unique technique with Q-tips and stencils to make a Valentine's day card.
Window Cards
A slight variation from stencil cards is window cards. Instead of cutting a shape in a stencil, you can cut the shapes or text directly on the front cover of the Valentine’s Day card. You can decorate your card behind the mirror in a number of ways, such as putting sentimental photos, some patterned paper, or even some meaningful words. We made a variety of window cards with different shapes and patterns. Here’s a look at the cards we made:


The cards in the top row have heart windows that we filled with pictures of our baby daughter. The bottom row has simple elegant rose cut out windows.
You can get the FREE template for these window cards here: FREE template for window Valentine’s Day Cards.
These are the 3 simple instructions on how to make window Valentine’s Day cards.
1. Draw the heart shapes on the front of the card using a pencil (draw lightly as you will need to erase any pencil marks that remains after cutting). You can also use stencils to draw your heart. Follow the first step of the instructions in the Stencil Card section above to make your own stencil. You can also draw other shapes such as flowers, balloons or square windows. If you do not want to draw directly on your card, draw your pattern on a sheet of paper, and use this as a template to cut through your card. Tape or use repositionable glue to attach the template to your card.
2. If your pattern is large enough, you can use scissors to cut the window out. If your pattern is small or complex, then you will want to use an X-Acto knife to cut the shapes out. I’d recommend cutting your card on a self-healing mat or something you don’t mind cutting up (old magazine, stack of paper, phone book), so you do not damage your table top.
3. Finish the card by decorating the card behind the window. Here are some creative ideas of things to put behind the window: a photo; patterned paper, text, stenciled shapes, chocolate hearts or kisses.
You can find another example of a unique window card at Artful-kids.
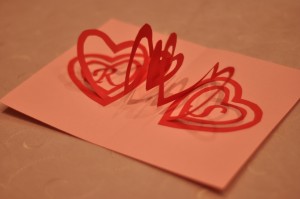
Quilled Cards
Another unique way to decorate your card is to use a 500 year old art form called quilling. Quilling may be somewhat time consuming, but it is a very elegant way to decorate your card! This technique involves rolling thin strips of paper around a “quill” and arranging the rolled up paper to form different shapes and designs. This technique gives the front of your card a 3-dimensional look. Since quills are hard to find these days without having to pluck one from a pigeon, you can use modern day toothpicks instead. If you really want to get fancy, you can buy quilling tools so you can feel like a pro. The best way to learn about quilling is to watch a video. Here is a good video to show you the basic techniques of quilling.
Once you master a few of the basic techniques shown in the video above, you can be creative and design your own quilling masterpiece! It’s actually easier than it looks. We made this simple quilled card with a heart that was filled with little hearts.

These are the steps to make your quilled Valentine’s Day card:
1. Draw your design on a separate piece of paper first. This will help you plan how your final design will look. If you are going to fill a heart or any other shape with coils, then create a template of the final shape by cutting the shape out of another piece of paper and laying it on top of your card.
2. Cut long strips of 1/8” -3/8” wide paper. It’s better to have strips that are too long because the strips can be trimmed later. I find it easier to cut nice straight strips using a ruler and an X-Acto knife instead of scissors. You can also buy quilling strips, which will make your life easier.
3. Create the shapes needed for your design by using the basic quilling techniques and place them on your drawn pattern. Again, you can use a quilling tool, or simply use a toothpick to make your coils. Here’s a quick tip, moisten your fingers or the end of the strip of paper to help start the coil. I like roll the strip by pushing my thumb forward over the paper. Glue the ends of your coils to itself, if your design requires the coils to be closed. After you create all your coils, arrange them onto the cover of your card.
4. Spread a thin layer of glue on a scrap piece of paper. Be sure to use a glue that dries clear, such as (insert link to amazon with type of glue). Gently place your coils on the thin layer of glue to evenly apply glue to one side of your coil. I like to use a pair of tweezers so I don’t get glue on my fingers. Be careful, it’s easy to get glue stains all over you r card.
5. Populate your design with the coils. Try not to move your coils once you set them down because your glue will smear. If you are filling a heart or other shape with coils, start with the outside of your shape first. Let the glue dry before filling the rest of the inside coils. This will make it easier for you to fill the inside coils because they will be held in place from the outside coils.
There are many nice quilled Valentine’s Day cards online. Here are some of the best quilling Valentine ideas I found:
Dannie's Designs, The Making Spot, Stamping with Blue Moon Creations, Lin Handmade Greeting Cards, Inna's Creations
Origami Hearts Cards
Another creative way to decorate your Valentine’s Day card is to attach origami hearts to the front cover. Origami has always been one of my favorite paper crafts. You can even give the origami hearts as is, with a special message on the back. There are several ways to make origami hearts. I’ve researched bunch of hearts from instructions online to find out which one looks the best while still being easy to make. Rich made a quick video on how to make a very simple origami heart.
After you make the valentine origami heart, glue it to the front or inside of your card. Here are 2 simple origami heart cards we made.

If you prefer to use written instructions to make the heart, here are step by step instructions: Origami heart folding instructions. You can also use these hearts to decorate lollipop tops as shown in Zakkalife’s blog.
Finger Print Cards
If you want to personalize a card, why not personalize it with your own fingerprint? It’s guaranteed to be one of a kind! Using your finger or thumb print is a very creative way to make hearts. This is a very simple and a fun card to make with children. This is also a special card for the family member who receives it, because of the cute tiny personalized children fingerprints. We made a card with all three of our fingerprints. It was a little tricky getting our baby’s fingerprints so we did hers first. After we picked the nicest looking one, we made our prints next to them. Here’s what the card looks like:

Follow these simple steps to create the fingerprint heart card:
1. Using an inkpad or acrylic paint, create fingerprints so that the base of the print overlaps to form the heart shape. Make the prints on a blank piece of card stock. If you are using your child’s fingers, make sure all his or her other fingers are clean first. You can also use different fingers to vary the size of the heart. Theoretically, you could also use your toes if you wanted large heart prints, if you don’t mind getting a little messy! I like using an ink pad because it shows the actual finger print, but you can use other acrylics or finger paints to give more texture to the print.
2. Cut the card stock around the hearts to frame the fingerprint masterpiece. You can cut a simple rectangle or square, or you can be creative and cut heart shape around the fingerprints.
3. Glue the card stock with the fingerprints onto the front of your Valentine ’s Day card. Then decorate the card with other embellishments such as glitter, stickers or ribbon.
Here are other examples of the fingerprint cards from Babble and Artful-Kids.
Tissue Paper Flowers Cards
Another great Valentine’s day idea is to decorate your card with tissue paper flowers. I thought this was a clever and simple idea when I first saw this on Artful-Kids. This card is perfect for any special person in your life you want to surprise! It’s very elegant, creative and simple to make! Here’s a card we made with a dozen tissue roses. We used red cellophane to wrap the stems, which we made using thin strips of green paper. Here’s how the card turned out.

To make this card, just follow these steps.
1. Tear small pieces of tissue paper of your desired color. You can make them all the same color, or use different colors to add some variety.
2. Scrunch them up into small tissue balls (easy!).
3. Glue them in place. A single rose looks nice but I prefer a bouquet of flowers. When the glue dries, embellish the card by drawing in the stems, gluing paper cut outs, or adding ribbon.
Candy Covered Cards
If your Valentine has a sweet tooth, this Candy Covered Valentine’s Day card is perfect for him/her! This is probably one of my favorite types of cards, because I have a sweet tooth! Hershey kisses and Sweet Hearts are probably the most common chocolate to attach to a card, but there are other candies that are just as good. You can use colored M&M’s, Bit-o-honey, Smartie’s, Sugar Babies, or heart shaped lollipops. Many brands have made special Valentine’s Day versions of their candy, so there are many to choose from. Here are a few examples of cards we made with from candy we had:


The card on the left was made from Sweet Tarts. The other 2 cards were made with Crunch chocolates. The card on the right is also a window card. If you want to go big, you can make a card and write something meaningful using different candies. Take a look at these cards for inspiration:
Thank you and Candy Card, Smarty Pants Card, Fish tank cards, Bit O Honey
The ultimate candy card is one that has candy that you make yourself. Here are some ways you can make your own Valentine’s Day treat to give with your card: Dipped Oreo Cookie, Chocolate caramel candies.
You can buy cheap heart chocolate molds at Michaels or on Amazon.
Scratch-off Hidden Message Cards
Is your Valentine into surprises, mystery or …lottery tickets? Here’s a unique card that keeps your Valentine in suspense until he or she scratches the hidden message away! There are many creative (or naughty) ways to use this scratch-off card:
• Your Valentine can scratch to reveal a simple hidden message
• Your Valentine can scratch to reveal where you both will go on your Valentine’s day date
• Your Valentine can scratch to reveal if he or she will get a kiss, hug, massage…or anything else tonight
• Your Valentine can scratch to reveal what chore he or she is exempt from tonight
• Make your card look like a lottery ticket and your Valentine can scratch off the winning numbers
• Make your card look like a slot machine and your Valentine can scratch off the winning symbols
• Make your card look like a blackjack or poker hand and your Valentine can scratch off the winning cards
• Planning a proposal on Valentine’s day? Imagine the surprise on your sweetheart’s face as she scratches off the message to find “Will you marry me?” You can also make it even more amazing by having a popup card ring in the inside, and perhaps the actual ring hanging from it! That will definitely be the best Valentine’s Day surprise!
Here are a few fun cards we made to give each other.


If you like the cards we made you can download the template we created here: Scratch-off Hidden Message Valentine’s Day card. You can then write in your own surprise message in the scratch-off areas.
Once you’ve decided on the theme or idea of your card, follow these steps to make it:
1. Write or print the words or image you want to cover with the scratch off material.
2. Mix 2 parts acrylic paint with 1 part dishwashing liquid. Metallic (silver) or red work well for this card. Don’t worry about using green or colored dishwashing liquid. The acrylic paint will be much darker. There are two ways to cover the target area with the paint solution.
3a. Cover the scratch-off area with contact paper or packaging tape. Paint the scratch off area with the paint/dishwashing liquid solution. You may need several coats of paint to cover the image or text complete. Wait 30 minutes to 1 hour between applications. If you want to pattern the scratch off area with a heart or any other shape, then cut the shape out of another piece of paper first and use it as a stencil. I’d recommend using the repositionable glue to hold the stencil in place so you do not get any paint underneath. If your paint leaks, then you can always come back with a knife and scrape the paint off of the unwanted areas.
3b. Draw the shape you would like the scratch off area to have on the back of the contact paper. If you don’t have contact paper (who has contact paper lying around at home?), you can use packaging tape. Apply the tape to wax paper temporarily to make it easier to handle. Draw the pattern on the back of the wax paper. Use a stencil or template to get a nice shape. You can use a permanent marker to draw on the wax paper. Paint the top side of the contact paper or packaging tape with the paint solution making sure you cover the entire pattern you have drawn on the back. You may need several coats of paint to cover the image or text complete. Wait 30 min to 1 hour between applications. When dry, cut the shapes out of the contact paper or packaging tape. Remove the backing (or wax paper) and affix the shapes over the text or image you want to cover. How do you remove the wax paper from the tape? The trick is to use a needle and carefully poke through the wax paper, and not the tape. You can then easily tear the wax paper off. This is the technique we used for our cards.
Don’t forget to include a coin (or “key” to your heart) with your card to use as a scratch-off tool! I was surprised how well this scratch off technique works.
Here are a few more scratch-off Valentine's day card ideas from TeaspoonSF, Mister G and Me, and BHG.
I hope these techniques help you create a very special Valentine’s day card. If you find this information useful, please share this article with your creative friends.
Billie Sandifer
Posted at 04:21h, 07 FebruaryThis blog is full of inspiration. I have used your patterns for other years and the recipient was so impressed. Too bad you weren’t there to hear the comments. I keep a file of your designs. Thanks for sharing!
Creative Rich
Posted at 03:59h, 08 FebruaryThanks Billie! The reactions from the people who receive the cards are always so positive, that’s why I keep making them.
Jane McCarty
Posted at 04:48h, 07 FebruaryThank you for the valentine cards! Love them!
Creative Rich
Posted at 03:58h, 08 FebruaryThanks Jane!
Judy Lee
Posted at 05:12h, 07 FebruaryGreat ideas for Valentine cards. I can’t wait to try the scratch off idea.Thanks!
Creative Rich
Posted at 03:57h, 08 FebruaryThanks Judy. There are a lot of things you can do with the scratch-off cards.
Ira Adisty
Posted at 06:15h, 07 FebruaryAwesome…. Keep it up Rich… love your ideas and your wife too…
Creative Rich
Posted at 03:57h, 08 FebruaryThanks Ira!
Wen
Posted at 07:30h, 07 Februaryi’ve liked the page 🙂 and shared this on my facebook page
Creative Rich
Posted at 03:56h, 08 FebruaryHi Wen! Thanks for sharing my website!
Laurel
Posted at 07:30h, 07 FebruaryThanks for a bunch of wonderful ideas. Most applicable to other holidays too.
The fact that you share is generous of you. Thanks.
Creative Rich
Posted at 03:56h, 08 FebruaryThanks Laurel. I’ve used many of my Valentine’s cards for birthdays too. I’m glad you find other uses for them as well.
Charlene Strozewski
Posted at 07:30h, 07 FebruaryThanks for the cards. I appreciate getting them. The ones with your baby are sweet.
Creative Rich
Posted at 03:55h, 08 FebruaryThanks Charlene! I love my baby girl!
SharonS
Posted at 09:45h, 07 FebruaryThank you for the valentine card templates and the list of 10 ideas. Would it be possible to share the name of the font you used on the fronts of the 2 free template cards?
Thank you!
SharonS
Creative Rich
Posted at 04:38h, 08 FebruaryHi Sharon. I used Cooper Black (italic) and Monotype Corsiva. Thanks!
Sharon Taylor
Posted at 10:39h, 07 Februarygreat cards, thanks sooo much
Creative Rich
Posted at 03:50h, 08 FebruaryThanks Sharon!
Doris
Posted at 12:34h, 07 FebruaryI really love your cards I just want to know how to login
Creative Rich
Posted at 04:43h, 08 FebruaryHi Doris, Click here to login. You’ll need to create an account first.
Tammy Henderson
Posted at 16:46h, 07 FebruaryRich,
Please tell your WIFE I said you are the BEST ! I Love Your Website and Will let all my fellow card makers know about your site. You and your WIFE make awesome cards and I just cannot say enough how much I enjoy your work.
Great Job !
Tammy Henderson
Creative Rich
Posted at 03:50h, 08 FebruaryThanks Tammy! I’m glad you enjoy the cards!
pitchou
Posted at 18:33h, 07 FebruaryJ’adoreeeeeeeeeeeeeeeeeeeeeeee la carte st-valentin et moi je parle de votre site a plusieurs de mes amies , votre site deviens une référence pour les cartes pop up et vos modèles sont tellement beau Je vous souhaite longue vie et encore de merveilleuse création
Creative Rich
Posted at 03:48h, 08 FebruaryMerci beaucoup!
Bonnie
Posted at 18:58h, 07 FebruaryThanks for the cute cards. Tell Rich I am Abigail fan. He is so talented.
Creative Rich
Posted at 03:46h, 08 FebruaryThanks Bonnie!
elga
Posted at 23:56h, 07 FebruaryHola:
Te agradezco mucho el que compartas tu talento.
Eres de la mejor, como artista y como persona.
muchas gracias 🙂
Creative Rich
Posted at 03:21h, 08 FebruaryThanks Elga!
Gretcheina Myers
Posted at 01:04h, 08 FebruaryThank you so much for taking all the time to teach such cool techniques… I can’t wait to wow my friends with some really neat valentine’s…
Creative Rich
Posted at 03:21h, 08 FebruaryHi Gretcheina, I’m glad the information was useful for you. Thanks for visiting.
karasu nobita
Posted at 04:41h, 08 Februaryi love those cards, simple but beautiful and cute.
thanx a lot for those free partterns 😀
Creative Rich
Posted at 04:47h, 08 FebruaryThanks Karasu!
Photo Book Girl
Posted at 15:02h, 08 FebruaryLove all the designs! Can’t wait until Photo Book Baby is old enough so we can do these crafts together!
Creative Rich
Posted at 01:39h, 09 FebruaryThanks PhotoBookGirl! I love your must read tips on making photobooks!
Vizcochi
Posted at 18:30h, 08 FebruaryThanks, Rich! I love your tutorials. You are a genius!
Creative Rich
Posted at 01:35h, 09 FebruaryThanks Vizcochi! I’m glad the tutorials are useful.
Hao Tang
Posted at 22:08h, 08 Februaryit’s so pretty and cute
Alisa Chen
Posted at 07:13h, 14 FebruaryHi, I already subscribed to your mail list; however, I didn’t receive any link to free valentine’s day templates. Please help. thanks!
Creative Rich
Posted at 09:12h, 14 FebruaryHi Alisa, you should have received the confirmation email soon after you verified your email. Please check your spam filter. Thanks!
mackenzie
Posted at 11:40h, 03 Februaryssssoooo cute
Sharifa
Posted at 13:10h, 11 FebruaryI really like those ideas they are amazing. Is there any video steps?where it shows how you make them?
CreativeRich
Posted at 13:53h, 11 FebruaryHi Sharita, sorry, I do not have any videos other than the ones on this post. Hopefully the images of the cards help. Thanks!
catherine
Posted at 15:32h, 11 FebruaryRich – You have been busy! I already made one of your fabulous Valentine’s pop-up cards for my husband; and I used another one of yours for our anniversary. We both agree that the pop-up cards are most impressive. Thank you so much for your creativity!
CreativeRich
Posted at 07:29h, 12 FebruaryThanks Catherine!
Diane
Posted at 04:14h, 12 FebruaryDear Creative Rich,
Thank you so much for the creative and adorable heart cards..Happy Valentines Day to you and your honey.
Sincerely,
Diane
CreativeRich
Posted at 07:28h, 12 FebruaryThanks Diane! Happy Valentine’s day to you too!
Suzanne Mueller
Posted at 21:00h, 02 AugustHi, Rich. I just found your site while looking for pop-up card ideas. Your designs are wonderful. I hope to be back often.
Thanks.
Suzanne
CreativeRich
Posted at 23:45h, 02 AugustThanks Suzanne! I hope I can inspire you with my designs.