
22 Oct Teddy Bear Pop Up Card: Tutorial and Template
Finally, I finished this tutorial for the teddy bear Valentine's Day, birthday, Christmas, and baby shower popup card. I really like this card because it is so versatile. I mentioned in the previous post that you can use this card for other occasions by adding additional clip art parts. For example, for a Mother's day card, you can add some flowers in the bear's hand. You can use the flowers from the template from the Mother's day bouquet card. For a Father's day card, you can put some grilling utensils in the bear's hand. The utensils can be taken from the Father's day grill pop-up card. You can add a graduation cap for a graduation card and maybe put a costume on the bear for Halloween. You can be very creative with this card.
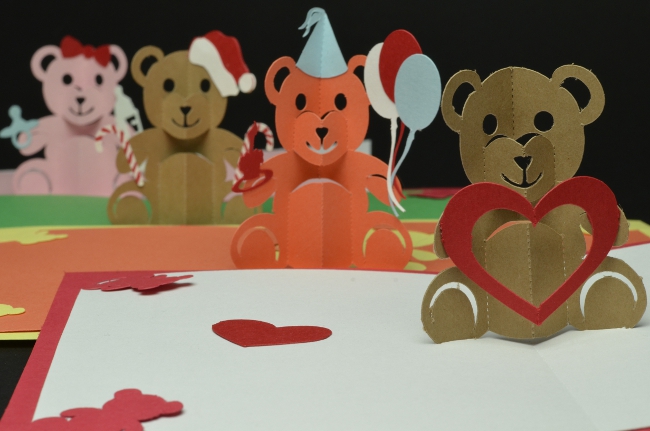
I love teddy bears and have a pretty big collection of them. My first teddy bear I adopted was when I was a few years old. I had to make a teddy bear card that I liked. Before I started, I wanted to find see if there were any other good pop up bear cards. I searched and searched and there really wasn't anything out there that I liked. Many of them opened up 90 degrees or weren't cute enough. I've also spent a lot of time thinking of ideas for making a simple teddy bear card. I wanted to make something simple, since I may be making a lot of these for my baby shower. I finally came up with an idea that I really liked. I gave the bear's face and belly some depth by inverting the folds. I was able to try out different shapes and angles using my 3D CAD tool. After I made the first baby shower card, I had to make the Valentine's day, Birthday and Christmas card. So here are some close up images of the cards.


This tutorial is a big long because I'm still getting used to my new video editing software. The video below will show you how to make the teddy bear pop-up card.
Instructions showing how to make the teddy bear pop up card:
- Purchase the template to this design here: Teddy Bear Pop Up Card Template.
-
Print out the template. There are 4 pages to this template:
- Page 1: Template for the 2-part card. This version is slightly faster to make and cuts the bear out of the same card as the inside card.
- Page 2: Template for the 3-part card. This version lets you make the bear and the inside card out of different colored card stock.
- Page 3: Template for outside card. This is used for both versions
- Page 4: Template for Valentine's day, birthday, Christmas and baby shower clip art.
- Determine which version you want to make, the 2 piece of 3 piece version.
- Cut out the templates using the methods I've shown in this post: How to use templates to make a pop up card.
- Fold the bear in half along the score lines down the center of the bear. Then invert the fold of his belly so that it sticks out forward.
- Invert the fold of his mouth and nose so that it also sticks out forward.
- Fold the tab in his foot (or feet) forward.
- Fold the inside card in half down the center score line.
- If you are making the 2-part popup card, then fold the bear up at his attached foot and insert the tab on his other foot into the inside card.
- If you are making the 3 part popup card, then insert each tab on each foot into the respective slots.
- Fold the outside card cover in half along the center score line.
- Insert the inside card corners into the teddy bear corner slots in the outside card cover.
- Glue any clip art parts to customize the card.
I hope you enjoyed this tutorial. Please let me know how your cards turned out in the comments!
Maria
Posted at 12:36h, 23 OctoberThank you for sharing, you are a genius when it comes to pop up cards now I have to learn how to cut them :o) it wont be easy for a leftie.
jingvites
Posted at 13:00h, 23 Octoberbears for all occasions! nice!
Bea
Posted at 14:23h, 23 OctoberWell done ….Hmm…I LIKE TEDDY bear card! Thank you
Edward Olson
Posted at 14:42h, 23 OctoberI just love the teddy bear pop-up, thanks so much for the template.
Linda
Posted at 15:27h, 23 OctoberLove it . . . thank you once again !
Marg
Posted at 16:21h, 23 OctoberThanks so very much for the tutorial. What a wonderful card.
Brenda
Posted at 16:49h, 23 OctoberThanks so much for notifying me of the release of your tutorial. I love your work and can’t wait to try making some of these. Great job and blessings to your little family.
Petrina
Posted at 17:10h, 23 OctoberYour Art is beautiful.
Cannot wait to see more.
Happy thoughts,
Petrina Case Studio
Soraya
Posted at 19:39h, 23 OctoberRich,
You are so clever! I’m so thankful for you and your generosity.
Deedy
Posted at 19:41h, 23 Octoberi luv it ^__^
nimrod
Posted at 23:57h, 23 Octoberhey man.. really thankful for the video on 3d heart.. i made 1 actually.. and gave it to my bestfriend’s debut last oct 18…
still i dont have any reaction from her.. maybe she hasn’t opened it ehehe…
hope that you create more… and by the way.. if you have time can you make something related about our 1st dance(1st ever dance..) in highschool it was xmas party.. thnx…. and hope your cough is gone..
maude joanna rego
Posted at 00:36h, 24 Octoberhey there! amazing card, thank you so much for this website and all your tutorials i made the entwined hearts last week and my boyfriend loved it!
I live in Dubai and eid is coming up, any ideas for a pop-up card i can make for friends?
maybe a mosque, or something more neutral towards all holidays?
please do reply, id love to try something new!
klare
Posted at 01:01h, 24 Octoberwow it looks fab, will have to give this 1 ago. lady who lives nextdoor to me is due to have twins this week and this would be a cute card to send her. thank you for sharing your insperation and tallent with us
klare
:O)
x
Sandra
Posted at 04:02h, 24 OctoberMany thanks for your templates. Love the teddy.
Sandra
Stella Moore
Posted at 04:32h, 24 OctoberHoping to make the card using my Make the Cut program!
Suyu Liu
Posted at 06:12h, 24 OctoberIt it very Beautiful, I love it, and I am going to try it.
Susan
Posted at 09:52h, 24 OctoberThank you for posting this Teddy Bear pop-up tutorial. You are so kind to share with others what you have designed. Your art designs are beautiful and architecturally interesting. I have made some of your cards for my family and they love these cards more than any other that I have made. Oh, and what a cute teddy bear that inspired you in making this card.
Susan
KITT
Posted at 10:54h, 24 Octoberthanks for sharing your so talented. I’m new to the your site, but i’m sure I’ll be back often.
Claudia
Posted at 11:20h, 24 OctoberThanks for sharing this! It looks great; I’ll try though I’m really clumsy when it comes to cutting … 🙂
Liliana
Posted at 15:48h, 24 OctoberIt is so beatuful!!! You are a genius!!!! Congratulations and thanks!!!!
Laura Benedetto
Posted at 16:35h, 24 OctoberJust too cute. Love this card.
Diane W
Posted at 09:31h, 25 October“Awesome” and soo cute!! :0) Thank you so much for sharing your idea.
Creative
Posted at 07:38h, 26 OctoberThanks everyone! i’m glad you liked this card. I love this card. Hope all your cards come out great!
Petrina
Posted at 03:51h, 27 OctoberGreat job and so cute.
Your art is beautiful.
Keep up the great creations!
Cannot wait to see more,
Petrina
Francis
Posted at 14:52h, 27 OctoberO: I just love it. Its so Cute! But can you make the Templates for the Birthday Bear,Christmas Bear, and Valentines bear.
I just love your cards And Thanks! 😀
Francis
Posted at 14:56h, 27 OctoberOhh Hehe! Sorry for the comment up there ^
I found the template. Hehe Thanks so Much!! (:
lily Foo
Posted at 04:31h, 30 OctoberI like your cards so much. but how to convert those PDF file to SVG?
Creative
Posted at 06:55h, 30 OctoberYour cutting machine should have a “tracer” function, so you can trace the lines.
Lily Foo
Posted at 16:23h, 30 OctoberI’m using the eCraft software, there are no tracer function and i can’t even import the PDF file 🙁
Creative
Posted at 18:56h, 30 OctoberSorry about that. I did a quick search on eCraft, and wow, there are a ton of complaints about the software. I wonder if it can use software like Make The Cut or Sure cuts a lot. I’m not sure if either of these would help though.
Lily Foo
Posted at 21:30h, 30 OctoberHow you normally cut out your design? Using any cutting machine?
Creative
Posted at 06:20h, 31 OctoberYes, I use a cutting machine. I use a Klic-N-Kut, but I may get a new one soon. I’m looking at the silhouette Cameo, but haven’t decided yet. The ecraft machine looks slick, but it has terrible reviews on amazon.
lily Foo
Posted at 07:14h, 31 OctoberI had a lot of trouble figuring out that ecraft machine and the software is not great but that Make the Cut has a beta version of eCraft plug-in 🙂
Hope you can find a better cutting machine. Thanks for sharing this.
kim
Posted at 20:25h, 07 NovemberThanks for sharing a good tutorial. i am from south korea.
I am not goot at english but thanks to your kind tutorial , it’s easy to make
wonderful pop up card. just refering to your directions and pictures
i can understand how to make it .
i have some question….how to improve cut paper? expecially bear’s eyes and
small parts.. what kind of stationery do i use?
Creative
Posted at 20:48h, 07 NovemberHi Kim, I use think paper/card stock. Use paper/card stock that is thick enough to stand by itself. If the paper/card stock is too thick, then it will be hard to cut. You can cut out the fine features with an X-acto knife. Good luck!
Baby Shower Teddy Bear Thank You Pop Up Cards | Creative Pop Up Cards
Posted at 00:41h, 14 November[…] If you want to check out the tutorial and instructions on how to make this card, go to my blog post here: Teddy Bear Pop Up Card Tutorial and Template. […]
Lu
Posted at 05:18h, 14 NovemberI sure hope this comes thru,because U R Correct is saying that this IS the MOST cutest pop-up BEAR out there.Why not even the sites that sell pop-ups ave one that is SOooooo Adooorrriiible!:):);), Major Kudos 2 U.Ur wife must B Oh so proude 2have aperson that has a talent, she can count to 2 assist her. May he who had given U this awesome talent continue 2 give u the grace 2 enjoy, profit(?) and share it w/all>GBU 4 sharing this w/all of us.ThankYOU!!
Kitt
Posted at 08:15h, 16 NovemberGreat bear popup. my 1st grandson is due Nov 29th, this popup will make a great announcement card. Congrats to you and your wife. thanks for sharing your talent with us
Zoë
Posted at 12:30h, 01 DecemberGreat site !!
when does the tutorial for the christmas bear come online ?
Creative
Posted at 17:39h, 01 DecemberHi Zoe! It’s this same post! The template is included with the other teddy bear templates. You can use the same instructions, just use different clip art (santa hat, candy cane, they are all included).
asiya
Posted at 12:48h, 03 Decemberhi thank you for the tutorial im going to have a go at making these they look great. im thinking of making a graduation bear as my brother graduates soon, maybe i put a grad hat on the bear with a scroll in his hand. thanks again
Vasudha
Posted at 08:09h, 10 DecemberI used ur template but the card came out to be really small…what should i do?
Creative
Posted at 10:05h, 10 DecemberTry saving the file to your local computer and opening the .pdf file with Adobe Reader. The pages should be 8.5″x11″.
Vasudha
Posted at 22:50h, 10 DecemberThanks for the previous reply….as i am a beginner i dont know with what should i cut the bear’s face….its in the middle of the bear…and if i use scissors their will be a cut in the bear’s body?what should i do?
Creative
Posted at 23:24h, 10 DecemberYou need to use an X-Acto knife to cut out the card.
Vasudha
Posted at 04:16h, 12 DecemberI am really sorry to bother u again and again…but i am a beginner card-maker….and i have many doubts…..um i wanted to ask is the knife same as the paper cutter and will the knife be able to cut small and curvy things? anywys ur really good at cards
Creative
Posted at 05:46h, 12 DecemberIf you are careful, you can cut the curvy parts with an Xacto knife. You should use a very sharp knife. I also mentioned a paper cutting machine which can cut the paper for you.
Tricia Madhoo
Posted at 17:02h, 07 Januarythanks so much for the template, the card turned out beautiful, gonna b using it to make some valentine cards, thanks so much.
Kathy
Posted at 09:38h, 11 JanuaryReceived a pop up book for Christmas…I have a Xyron Create and Cut and can import .dxf files but I an unclear on how to use a cutting machine to do these type of cards. When I trace in the (create and cut) the outlines do not come out completely, so a manual trace and import, but I still have to place it on the cutting
board. Any help, tutorial, on this would be appreciated.
Thank you, in advance, for any assistance.
Kathy
Yuenie
Posted at 08:36h, 17 JanuaryJust curious, why do you not like 90 degree cards? They seem easier to glue (when I make your 180 degree cards, I tend to have some problems with the centrefold).
Other than that I love your pop ups! This is so versatile, easy to make AND adorable as dessert 🙂
Creative
Posted at 23:07h, 17 JanuaryHi Yuenie! I prefer 180 degree cards because they will sit on a table by itself guaranteed. Sometimes it’s hard to make a 90 degree card open up just perfectly. I do make 90 degree cards, but I think the 180 cards look more impressive.
Linda Sheets
Posted at 11:07h, 19 JanuaryI could not download the template for the teddy bear card? How do I get it?
Thanks
Linda
Creative
Posted at 13:20h, 19 JanuaryHi Linda, In the instructions above, there is a link to the template. good luck!
karishma
Posted at 06:43h, 21 Januaryelo.. i like ur pop up cards very much.. am trying z valentine teddy bear card to surprise my bf on valentine.. ur instructions make it very easy.. thank you 2 share zis with us..
also i wanted congratulate u for ur baby girl.. she’s very cute n sweet..
keep sharing ur talent wiz us.. God bless ya
lot of love 2 u n ur family..
Karishma
Lily
Posted at 06:57h, 26 JanuaryHi! I’m from, Poland and I’d like to make one of your cards but the words that you use like “congratulations” or happy birthday” I’d like to write in Polish so that everyone could understand it. I can’t find in the MS Office the font that you are using and it seems to be easy to cut out as it’s pretty thick. Can you please tell me where can I get the font? or maybe you could give us the whole alphabet with lower and upper case letters? I’d be very grateful for that :)Bes regards!
Creative
Posted at 19:27h, 26 JanuaryI actually bloated the letters so they would be bigger. I would suggest printing out the letters, then outlining the letters by hand with a pencil to connect the letters and make the text larger. Good luck!
Ishmael Ali
Posted at 23:46h, 01 Februaryhw am i suppose to get it free i got 2 more day b4 my couppon expires 🙁 help please ..
Aprenda fazer um lindo cartão para o Valentine’s Day | meiroca.com
Posted at 11:39h, 05 February[…] Para mais detalhes sugiro visitar o site creativepopupcards.com […]
georgia
Posted at 08:40h, 18 Decemberwhere we can find the paper in which there are the figures of the dear and other?
Creative Rich
Posted at 07:49h, 19 DecemberHi Georgia, Thanks for visiting my website. I’m not sure which card you are referring to. Can you be more specific?
Chloe Balatbat
Posted at 03:46h, 12 FebruaryHello. I made one of these (the Valentine card) and when I finished, I closed the card and then opened it again and when I opened it, the head was still folded. Why is that? But by the way, thanks for making this AWESOME card! I love teddies, too!
Creative Rich
Posted at 09:24h, 12 FebruaryHi Chloe, Make sure you score the folds in the bear’s head. It will help it to unfold.
suriya
Posted at 08:15h, 12 Februaryit is realy awsome but could done it with a sketch of your own because every one cannot take a printout of the given template
cindy
Posted at 19:25h, 15 Februarywhere do we get the paper ?
Creative Rich
Posted at 12:22h, 17 FebruaryHi Cindy, you can get paper at any craft or office supply store. You can also buy it online on Amazon.
dominique lopez
Posted at 18:33h, 28 Februaryspanish pleas
Creative Rich
Posted at 01:39h, 02 MarchHi Dominique. Thanks for visiting my website. Sorry, I do not know Spanish. Lo siento, yo no sé hablar español (from google translate).
addan emman
Posted at 13:07h, 12 Mayi wonder at your creativity please tell me specific website for paper cut templates
Creative Rich
Posted at 07:04h, 14 MayHi Addan, you can purchase my templates by clicking on the store link above.
Vanessa
Posted at 21:11h, 06 JuneJust two wordz… SUPERRRR CUTE
anne1014
Posted at 14:02h, 14 JanuaryWhat do you use for gluing the small pieces of clip Art? Thanks
Richard Chen
Posted at 11:49h, 18 JanuaryHi Anne! I use a glue stick most of the time. I take a pair of tweezers, and dab the paper piece onto the end of the glue stick, and then attach it to the card.