

30 Jan Valentine’s Day Pop UP Card: 3D Heart Tutorial
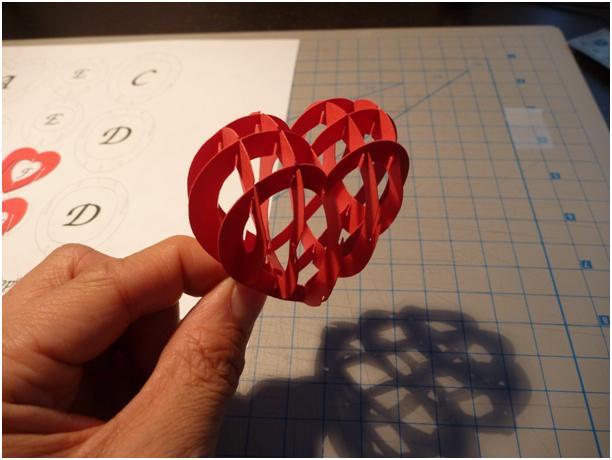
This is probably my most popular pop up card. After redesigning the card and creating the template, I was able to make the tutorial this past weekend. I could only get the video down to 11 minutes, which is still pretty long. It just takes time to do all the sewing and gluing. I still have a cold (that's lasted for a month) so please excuse my muffled coughs. I've sped most of the video up so you may need to pause it a few times or watch some parts over to get what I'm doing. It's not as hard as it looks. You just need a little patience to put everything together. It will all be worth it in the end when you give this card to someone you really care about. Here is a picture of the first 3D heart I made in 2007.

Here's the video of the tutorial.
Here is a transcript of the video: Narration for Valentine's Day Card: 3D Heart Tutorial
If you don't want to watch the video, here are the summarized instructions:
- Purchase the template for this design here: Valentine's Day Pop Up Card: 3D Heart.
- Print out the template and use it to cut the parts out of card stock.
- Cut out all the pieces making sure that you cut all the slots very precisely. If the slots aren't deep enough, you heart will be warped and wont fold flat.
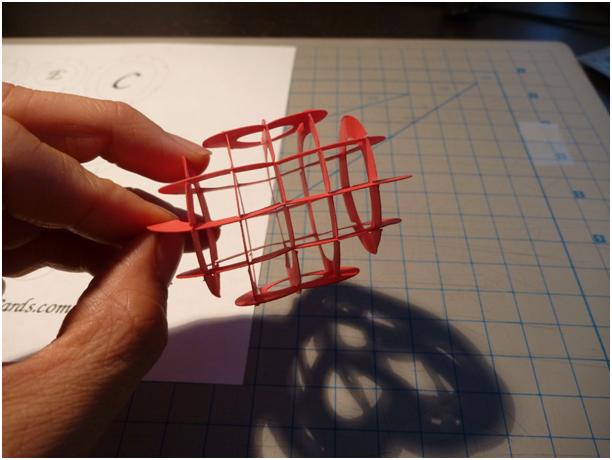
- Start assembling the heart with pieces A and C. Put the C ring into the A heart
- Assemble the rest of the rings (D, E) into the A heart

- Assemble the B heart pieces by starting at the top of the heart and pulling the rings through the center. Then slide the bottom of the rings into the bottom of the B heart
- Finish by sliding the F heart over the rings, starting from the top again.
- Cut out the card backing from white card stock. Poke holes at the center of the “X” using a needle or sharp object. You will attach the heart to this card.
- Cut out another card backing, without the holes, and cut it down the center so you have 2 pieces. This will be the outer cover.
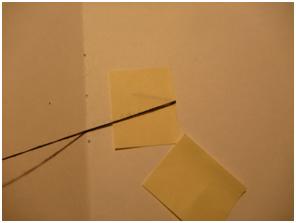
- Cut 5 pieces of thread 2-3 feet long. Use thread that is the same color as your card backing.
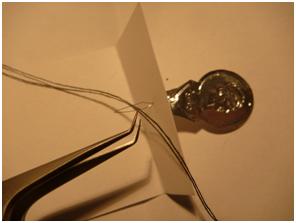
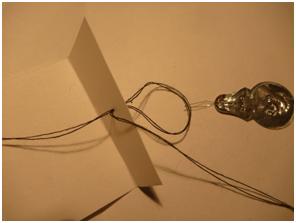
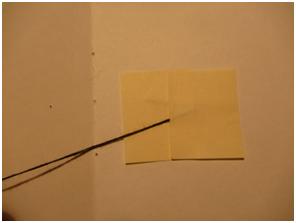
- Tie the thread at the 5 locations shown below. The thread should sit inside the slot in the heart pieces:
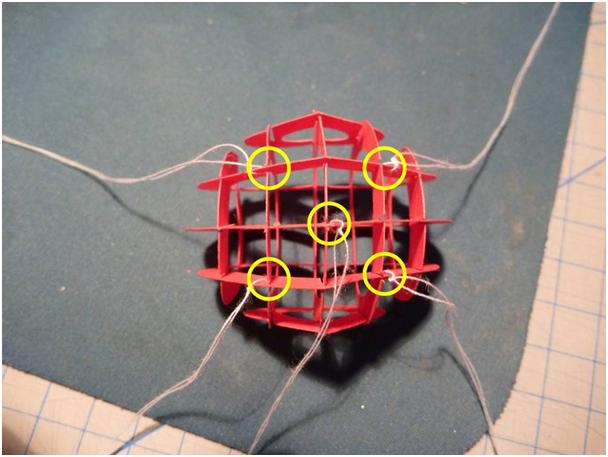
- Put the 5 threads through the 5 holes in the white card backing, starting with the center thread. Use tape to hold the thread in place so that it doesn't slip out accidentally. To pass the thread through the holes, you can use a needle, needle threader, tweezers, thin wire or floss threader (not shown). I'm using black thread in these next few pictures so that you can see it easier.
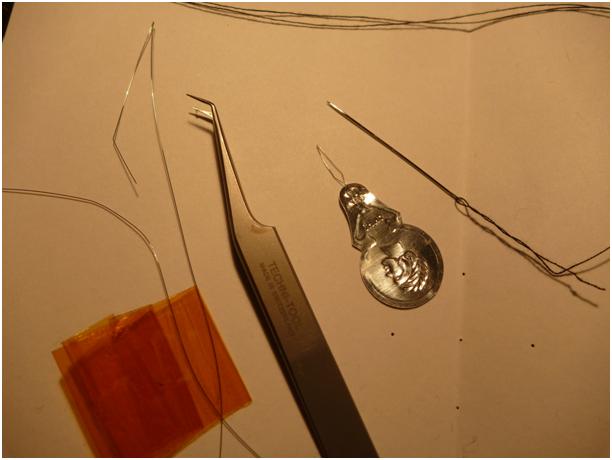
- If you don't have these items, you can just make the holes larger and pass the thread directly through. I prefer to use a needle threader. Here is what it looks like:
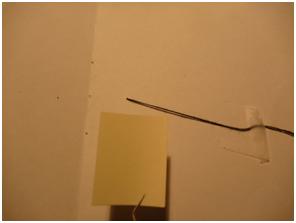
- Adjust the lengths and tension of the threads so that the heart stands up straight when the card is opened. Use tape to hold the thread in place.
-
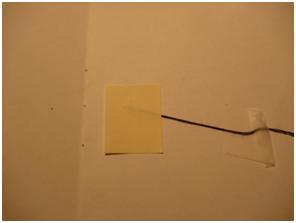
Glue the threads in place by gluing small pieces of paper on the threads.
-
Fold the string over the paper and glue a second piece of paper over the folded string. This will anchor the string in place.
- Cut off the excess string.
- Glue the outer cover pieces onto the backside of the card. Be sure to align the pieces to the center crease very accurately and make sure the card opens flat.
- Put the card under several books or flat objects so that the card will dry flat.
If the lengths are not adjusted correctly, the heart will not stand straight. If the string is not anchored properly, the string will slip over time and the heart will begin to droop down or it will not open fully. I recommend using 65lb paper or thicker for the backing. You may want to use dense cardboard. A variation of this card is to put initials in the center of the card. Attach the initials to the A heart piece.
Update 5/4/13:
I revised the design so that you can use an inside and outside card. You can use Page 3 and Page 4 of the template to make the backing look like the image below:

Once you attach the heart to the inside card with the thread, you can slip it into the outside card at the corners. This is a much simpler way to finish the card.
I've also created a series of images to show how to assemble the heart.

I hope you all enjoyed making this card. Good luck!
If you don't want to do all that sewing, Carol at Extremecards has a design for a neat stand to hold the heart. Check it out!
Extreme Cards and Papercrafting: Sliceform Card Stand
You can purchase this template in the Template Store or follow this link: 3D Heart Pop Up Card.
VIncent
Posted at 15:37h, 30 Januaryi did the heart.. but i don’t know how to fix the string… i guess i have to wait for the tutorial , nice job though
David
Posted at 18:02h, 30 Januarylove the card, love the tutorial!!! thank u very much!!!! I will figure out how to incorporate the initials in the center… have a good one. I will post mine when completed
Nycmom
Posted at 18:59h, 30 Januarywill keep an eye on it..
Ada
Posted at 19:52h, 30 JanuaryThank you so much for doing this for us!
Carol
Posted at 04:10h, 31 JanuaryI’m so glad to see your new blog. I can’t tell you how many emails I have gotten asking me if I know how to make YOUR designs LOL. I will continue to send them your way!
I tried a heart sliceform in Sketchup and it was a big fail. It looked like a hot air balloon because I made it fully round instead of flattened on the front and back. Oopsie.
ju
Posted at 07:45h, 02 Februaryit’s amazing!!!!
you are brilliant!!!!
thank you so so so much!!!! :))))))
lia
Posted at 11:25h, 03 Februarysin duda es maravilloso tu trabajo te pasaste ! estoy viendo tus tutoriales desde chile! ojala sigas subiendo mas trabajos porque son hermosos
lia
Posted at 11:28h, 03 Februarytu trabajo es maravilloso! me encantó! lo estoy viendo desde chile y quede asombrada muchas gracias y ojala sigas subiendo mas tutoriales , eres genial
Hannah
Posted at 02:51h, 08 FebruaryHaving difficulty with the initials. Can not figure out how to make it attach to the A heart but also still allow for the other hearts to fit inside. It’s puzzling me something severe, HELP PLEASE! Or if anyone can help it would be greatly appreciated. Thankyou
Creative
Posted at 08:12h, 08 FebruaryMake the initials on the side of the center “A” heart. do not connect the initials in the center. this will allow the other “rings” to fin inside. The connection of your initials to the heart should not be near any of the slots. I hope this helps!
xu xu
Posted at 21:46h, 13 Februaryhi why am i only having the knk format
CreativeRich
Posted at 16:24h, 14 FebruaryHi Xu Xu, You should have all formats for the template after you unzip the file. Please contact me directly if you are still having trouble. Thanks!
Milenka
Posted at 02:57h, 10 FebruaryThanks to you I am now able to do the most impressive card I’ve ever seen 🙂 Thanks for spending your time on doing the tutorial!
Glenda
Posted at 09:04h, 13 FebruaryWell, I did it, and it is undeniably awesome. It took two days, though. (Partly due to a power outage on day one.) I think this is a project for people of greater than average intelligence. Not sure I qualify, so I had to rely on patience and dogged determination. I am an art teacher, and while I am pursuing my own artistic interests, I am always looking for things that could be adapted for a childrens’ project. This one is a huge NO on that score, but I am very pleased with the end product on my own behalf.
DrakerDG
Posted at 16:12h, 13 FebruaryThanks for the tutorial. Excellent work.
My wife will love the card this February-14. 🙂
DrakerDG
Posted at 02:45h, 15 FebruaryThanks for the templates and tips.
This is my finished card: https://www.youtube.com/watch?v=qXVlVEGXnNw.
As I said earlier, my wife liked it.
Marg
Posted at 10:22h, 16 FebruaryThanks for the file and the tutorial. What a wonderful card.
Dian Y.
Posted at 10:52h, 24 FebruaryHats off to you!! Will try to make one later. Thanks!!
ela
Posted at 22:52h, 19 Julyhola soy de Colombia y me encanto la tarjeta pero no tengo ni idea de como hacer los moldes del corazón alguien me puede ayudar o si hay algun sitio de donde se pueda descargar o ver no sé espero me ayuden y obviamente mil gracias esta super
tatys perez
Posted at 17:06h, 04 AugustHow can i get the paper with the pieces to cut it?
Creative
Posted at 17:41h, 04 AugustYou can print out the template, tape it to the card stock you would like to make the card out of, then cut through the template and card stock.
AS
Posted at 08:37h, 19 AugustThanks a lot – I really like the design. I’m a cowboy, so I didn’t bother with the directions – I just went right at cutting it out and putting it together – and it worked out really well. The second time I did it, I used card stock instead of thick paper, and it was much easier.
At first I was curious why the templates weren’t colored, but then I realized that the form would then only have color on one side.
Paper Creations « Absent Soulmate
Posted at 06:43h, 22 August[…] is a link to the initial project that I found on the web for the sliceform heart. Share […]
cesar
Posted at 21:39h, 12 Octoberalguien me puede ayudar los moldes del Corazón, o donde puedo descargarlos,, gracias por ayudenme
Creative
Posted at 22:26h, 12 OctoberThe template is linked above after in the first line of the instructions, “Print out the template here:”
cesar
Posted at 18:43h, 13 OctoberThank You. gracias
HUONG GIANG
Posted at 16:01h, 20 OctoberTHANK YOU!!!!!!!!!!!
RBCWAC
Posted at 12:18h, 01 Novembermade it like 10 times in different colours and love it
great card dude
DaWeed
Posted at 07:09h, 14 NovemberI just finished my card and it works perfectly 🙂 thanks a lot for this
raul
Posted at 19:02h, 03 Decemberexcellent card, awesome!!!!!!!
congratulation, great job
Nancy Nicoll
Posted at 14:04h, 08 JanuaryThanks for your cards. My Grandchildren love getting these cards.
Keep them coming!!
Lyssa
Posted at 18:07h, 27 Januarythank you so much, each card is great and youre soo clever. i saw the spiral hearts card on youtube, but i cant find the template. its the one id like to do. could you point out where i can find it, or re-post it please. thanks again. this is a great page.
Creative
Posted at 23:13h, 27 JanuaryHi Lyssa, You can find the spiral heart tutorial here: Spiral Heart tutorial.
Revilyn
Posted at 21:27h, 29 JanuaryWhat kind of paper did you use in the 3D heart?
Creative
Posted at 07:29h, 30 JanuaryHi Revilyn, You can use 65lb cardstock. I wouldn’t go much lighter.
kuvy c
Posted at 04:46h, 03 Februaryhow to download the template?
use simple cardboard is ok?
Creative Rich
Posted at 15:11h, 03 FebruaryHi Kuvy, You can purchase the template at the store. You can use 65lb card stock. It is a very light card board.
kuvy
Posted at 03:04h, 03 FebruaryCould you send me pop up 3d heart template?THX
Creative Rich
Posted at 15:12h, 03 FebruaryHi Kuvy, the template will be instantly downloadable after it is purchased.
linh
Posted at 06:48h, 03 Februarywhere can I print out the template of the 3D heart tutorial?
Creative Rich
Posted at 15:06h, 03 FebruaryHi Linh, You can purchase the template for this card at the the store.
Ivan Landazury
Posted at 09:54h, 05 FebruaryHi, I´m from Mexico. I tried to make a payment with pay pal but I couldnt. Can you send me a mail with the instructions or other way to send you a payment please? Congratulations for this card, You did a great job!!
Emil Chodkiewicz
Posted at 23:38h, 09 FebruaryJust got it. Thanx. Good price, great idea with selling your creations.
rahul jajodia
Posted at 15:57h, 10 Februaryu r awesome how u made this u r just out of world i just love those thanks
asma
Posted at 15:47h, 11 Februaryhey! can u plz give me the 3d heart 4 free. coz i its difficult for me to use a credit card… plz can u?
YOUSSEF
Posted at 18:44h, 11 Februaryhow to download the teamplets
Creative Rich
Posted at 19:07h, 11 FebruaryAfter you purchase the template, you can download the template from your account by clicking on “My Account and Downloads”.
Diana Elisa
Posted at 21:11h, 11 FebruaryCómo le hago para que me manden mi contraseña!? Quiero el molde antes del 14 de Febrero. Ya le di en comprar y no aparece.. Espero respuesta, gracias
William Neal
Posted at 03:41h, 12 FebruaryDoing this to suprise the wife and I know she’s gonna love it. Thanks, Rich.
Creative Rich
Posted at 04:10h, 12 FebruaryHope she loves it!
douglas chan
Posted at 16:00h, 13 Februaryhow to get the templates 🙁
Creative Rich
Posted at 16:55h, 13 FebruaryThe templates are available in my Template store.
Jovana Calvillo
Posted at 23:01h, 13 FebruaryI already bought my template through paypal, how do I get it now?
Creative Rich
Posted at 06:03h, 14 FebruaryHi Jovana, your templates are available under “My Account and Downloads.”
monze marquez
Posted at 05:23h, 16 FebruaryYour work is wonderful, and you’re Super creative, too bad that you you’ve left handle by your ambition and now receive for something that was free, I try to put me in your place and understand that they are your knowledge and that it might be a little sad that nobody values them as you want I admired you because I thought you were a humble person but I see that does not in any way many congratulations for your work and creativity PD: I know that your prices are not high but perhaps you did not consider the exchange rate which makes your creations are too expensive for some. With love MONZE
Veronica
Posted at 03:41h, 22 MarchPOR QUE NO DEJAS LOS MOLDES PORFAVOOOOR………………..
Madushanka Dissanayake
Posted at 05:09h, 27 MarchNice work. We like it. Keep going..
zainab
Posted at 12:18h, 08 Mayhow can we purchase the template can we buy it using visa card or knet
Creative Rich
Posted at 12:25h, 08 MayHi! Yes you can purchase the template with a credit card. You will be using Paypal’s secure payment service when you check out.
zainab
Posted at 05:58h, 09 Mayhow to register in this website
reina
Posted at 14:27h, 14 Mayhola, hace tiempo se podia imprimir las plantillas de este tutorial, es mas he hecho este y otro. lo que no entiendo es donde puedo conseguirlas y me pregunto si tengo que pagar para tener las plantillas, necesito que me respondas. Es precioso el tutorial pero me gustaria tener las plantillas. Gracias
Luke
Posted at 17:46h, 15 JuneCan I order template if I am from Czech republic?
Creative Rich
Posted at 18:13h, 15 JuneYes! You can use a credit card to purchase the templates!
daniela
Posted at 13:34h, 21 Junehello, I really liked your pop-up card, but before you had a card from the mold and ready to print, please nesecito the mold of the heart 3D card pop-up card please ..
Daniela
Posted at 13:35h, 21 Juneporfavor nesecito el molde del la tarjeta 3D corazon pop-up tarjeta porfavor..
Cindy
Posted at 13:42h, 13 JulyEscríbeme! cinlore_23@hotmail.com
Daniela
Posted at 13:42h, 21 JuneI need to print out the template 3D card pop-up heart … PLEASE
Elisa Ortiz
Posted at 22:11h, 15 Augusthola buenas noches,
me gusto mucho tu manualidad, solo que donde puedo conseguir los moldes? quiero hacerlo para regalarselo a mi novio, me podiras proporcionar los moldes para hacer el corazon por favor
Muchas gracias
Saludos
jiya
Posted at 16:02h, 24 Septembercan you please upload video on any other site coz i can’t see its video on youtube…!!please help me..i have to make this card..
impflower Necio
Posted at 05:39h, 14 NovemberAwesmazing! Marvelous! Great! but i can’t have the template cause i am from philippines and i don’t have $4.9 to afford, can I have it for free? please? someone? somebody please help me! I am dying to make that Cool Pop-Up 3D Heart Card by the genius Richard!
ngoc
Posted at 06:39h, 18 Januarytoi ray thich boi vi no rat dep ,toi rat muon lam thu no mot lan xem sao nhung ko biet lam sao de co nhung tam giay nhu vay.neu ai co fie do vui long gui wa mail cho toi
teresa
Posted at 07:33h, 22 JanuaryMe podrian dar las instruccionen espanol
Madeline
Posted at 18:16h, 09 FebruaryDo you have to pay for the heart and circle shapes?
Creative Rich
Posted at 10:36h, 10 FebruaryHi Madeline, you can purchase the template in the template store. Thanks!
Leopardo
Posted at 03:48h, 14 Februarywhat is the Best paper type to use in creating the heart cause i tried lil thick paper it wasn’t that good especially at the edges?
Creative Rich
Posted at 03:57h, 14 FebruaryHi Leopardo, try using 65lb card stock.
diego gamarra pascual
Posted at 22:17h, 18 Februaryhello, sorry my English is not good, but I’d buy the template. What I have to do? thanks
Creative Rich
Posted at 08:56h, 21 FebruaryHi Diego, Thanks for visiting my website. Please go to the Template Store and add the template to your cart and check out. Thanks!
diego gamarra pascual
Posted at 16:10h, 26 Februaryfine, but when I buy the template, I can send in illustrator format
Creative Rich
Posted at 01:42h, 02 MarchHi Diego, I offer .svg and .pdf file formats. I do not have Illustrator. I’m assuming it can read those file formats.
Chloe Balatbat
Posted at 05:37h, 14 MarchWow, someone will sure use all of their effort for someone special! This would be easier for sewers, though. No wonder this is one of your most popular pop-up card, it’s so awesome!
Ty Ty Chau
Posted at 10:24h, 25 Marchmy girlfriend sure will love this. thx for sharing this amazing pop-up!
unknown
Posted at 11:31h, 24 Aprilhow can I get a model of the heart.
I can not find in any page.
Could you give me the url of the page and provide me with instructions on where this mold
Creative Rich
Posted at 10:20h, 25 AprilThanks for visiting my website. You can purchase the template for the 3D Heart pop up card here: 3D heart pop up card template
unknown
Posted at 11:35h, 24 Aprilneed this mold until day 04/25/13 please reply me urgently
fany vargas
Posted at 18:24h, 24 Augustdisculpa… “segun yo” compre el formato para hacer el corazon y todo pero no se como funciona esto no se si puedeses ayudarme esque ahh….. hasta resivi el correo de mi contraseña y todo eso pero no se donde esta oh como recibiere el formato…..
AYUDA…
gracias 😀
Chalklady
Posted at 10:19h, 08 FebruaryWONDERFUL! I love pop-ups. Yours are so creative, challenging and great fun. Thank you for sharing.
CreativeRich
Posted at 10:37h, 08 FebruaryThanks Chalklady!
Etrayos
Posted at 06:30h, 02 OctoberSorry if my english is not correct. How I can know if the strings are properly tightened before you glue?
The heart could not open well, or be twisted.
CreativeRich
Posted at 22:05h, 06 OctoberHi Etrayos. If you open the card, you can pull the strings through the card and adjust the strings until the heart stands straight. You can tape the strings temporarily until you glue the strings down.
hamza asiri
Posted at 10:48h, 27 JanuaryCan I ask you?
when I buy it I get the template and print it or it’s going to be shipped my address?
CreativeRich
Posted at 04:31h, 28 JanuaryHi Hamza. Once you purchase the template, you can download them instantly in your account.